|
|
Gaucho v2r0 Installation and User’s Guide |

LHCb Technical Note
Reference: LHCb-2004-096
Author: Eric van Herwijnen
Date: 11 november 2004
http://lhcb-comp.web.cern.ch/lhcb-comp/ECS/Gaucho/default.htm
Introduction
Gaucho (GAUdi Component Helping Online) was designed and developed by Philippe Vannerem who has now left CERN. The Gaucho architecture is described in
This document describes:
- How to modify your Gaudi code to publish counters and histograms so they can be viewed in real time using PVSS (page 3).
- How to install PVSS and the LHCb framework containing the Gaucho component (page 8).
- How to submit a job from the Gaucho PVSS interface and monitor the published information from PVSS (page 18).
The Gaucho components are shown in the Figure below.
Installing Gaudi prerequisites
Please note that the description that follows is temporary awaiting a seamless integration of Gaucho with Gaudi. I assume the Gaudi part will be running on lxplus at CERN.
To be able to use Gaucho with Gaudi, you will need to install:
1. Dim (current version v13), obtain by getpack Online/DIM head
2. Gaucho (current version v2r0), obtain by getpack Online/Gaucho head
3. GauchoJob (current version v1r1), obtain by getpack Online/GauchoJob head
To compile Gaucho (and GauchoJob), you do as usual:
- cd cmt
- source $LHCBHOME/scripts/lhcbenv.csh
- source $LHCBHOME/scripts/CMT.csh
- GaudiEnv (current version to use: v15r1)
- source setup.csh
- type make
The GauchoJob package contains a modified standard example of a Gaudi Job that publishes histograms and counters. The following sections explain how these files work.
To test your installation, run the script GauchoJob/v1r1/cmt/startgaudijob.sh.
Modifying your Gaudi job
The Gaudi services communicate with DIM and PVSS as follows:
Modifying the GaudiMain program
The GaudiMain program (Linux) should contain a pointer to the SvcLocator interface (6,24), and should create an instance of the GaudiDimController (17) and run it (37), as shown in the figure below for a simple GaudiMain program. The Application Manager is steered by the GaudiDimController program.
|
1: // Include files 6: #include "GaudiKernel/ISvcLocator.h" 11: char* nname; 12: nname= new char[50]; 14: gethostname(nname,50); 15: 16: // Create an instance of the Gaudi Dim Controller 17: GaudiDimController* gaudimctrl = new GaudiDimController(nname); 18: 24: SmartIF<ISvcLocator> svcLctr (
IID_ISvcLocator, iface ); |
The Job Options file
An example of a job options file for a Gaucho job is shown below. The quantities which are published in this example are calculated in the HelloWorld and PartentAlg algorithms.
|
1: //
Include standard option files 4: //
services needed by a standard job 6:
ApplicationMgr.ExtSvc = { "EventSelector" }; 8: 10: //
must not be used by a statically linked program 12: 13:
AuditorSvc.Auditors = { "ChronoSvc"}; 14: 15: //
Private Application Configuration options 19:
(2=DEBUG,3=INFO,4=WARNING,5=ERROR,6=FATAL) 21: 22: //
Event related parameters 24:
ApplicationMgr.EvtSel = "NONE"; //do not use any input events 27://
Setup the next level sequencers and their members 31:
Sequence2.Members = {"Prescaler/Prescaler2",
"HelloWorld", "EventCounter/Counter2" }; 36:
Prescaler1.OutputLevel = 4; 37: Prescaler2.OutputLevel = 4; |
The GaudiDimController program
The GaudiDimController program takes as argument the hostname where the program is running, and starts a DimServer called “HLT”+hostname.
The GaudiDimController allows the Gaudi application to be steered via commands (config, start, pause and stop) that it receives from DIM (via a DimCommand called with the name=hostname). It publishes the state of the program (configured, processing, paused or stopped) as a DimService called “status”. After configuring the Application Manager, the GaudiDimController sets itself to sleep until the next command arrives. The Application Manager executes the eventloop when it receives the command “start”.
If you are happy with this behaviour, you will not need to modify the GaudiDimController program.
Algorithms
The HelloWorld algorithm is a standard algorithm, in the case of our example it doesn’t do anything. In our example, the work is done in the ParentAlg, as shown in the Fugure below. We show an extract of this file to highlight the important points:
- the declaration of the information to be published (counter1, fraction, status and eventtype) during initialization via the method: m_publishsvc->DeclInfo(‘label’,variable)
- the calculation of the variables during execution
- the undeclaration of the information during finalization via the method: m_publishsvc->UnDeclInfo(‘label’,variable)
|
// Include files #include "GaudiKernel/MsgStream.h" #include "GaudiKernel/AlgFactory.h" #include "GaudiKernel/DataObject.h" #include "GaudiKernel/IDataProviderSvc.h" #include "ParentAlg.h" # define mysleep() usleep(100000) // Static Factory declaration static const AlgFactory<ParentAlg> Factory; const IAlgFactory& ParentAlgFactory = Factory; // Constructor ParentAlg::ParentAlg(const std::string& name, ISvcLocator*
ploc) : Algorithm(name, ploc), m_publishsvc() { m_publishsvc =
0; } StatusCode ParentAlg::initialize() { MsgStream
log(msgSvc(), name()); StatusCode sc; sc =
service("HistogramDataSvc", m_histosvc, true ); sc = serviceLocator()->service("MonitorSvc",
m_publishsvc, true ); if(
!sc.isSuccess() ) { log <<
MSG::FATAL << "Unable to locate IPublish interface" <<
endreq; return sc; } counter1=0; frac1=0.0; status=new
char[20];
status=strcpy(status,"initializing"); myhisto =
m_histosvc->book("1", "eventtype", 5, 0.5, 5.5 );
m_publishsvc->DeclInfo("counter1",counter1);
m_publishsvc->DeclInfo("fraction",frac1);
m_publishsvc->DeclInfo("status",status);
m_publishsvc->DeclInfo("eventtype",myhisto);
time(&time_old); // use Random Number Service to generate
trigger events sc =
random.initialize(randSvc(), Rndm::Flat(0.,1.)); if (
!sc.isSuccess() ) { return sc; } return
StatusCode::SUCCESS; } StatusCode ParentAlg::execute() { MsgStream
log( msgSvc(), name() ); StatusCode sc; std::vector<Algorithm*>::const_iterator it = subAlgorithms()begin(); std::vector<Algorithm*>::const_iterator end =
subAlgorithms()->end(); for ( ; it !=
end; it++) { sc =
(*it)->execute(); if(
sc.isFailure() ) { log << "Error executing
Sub-Algorithm" << (*it)->name() << endreq; } } counter1++; // use Random
Number Service to get generate trigger events float
dice1=random(); float
dice2=random(); float tfdice; float
bincons[80]; int binnr,i; //eventtype histo if
(dice1<0.5) {
myhisto->fill(1.0); } else
if(dice1<0.95){
myhisto->fill(2.0); } else
if(dice1<1.0){
myhisto->fill(3.0); } if (counter1 %
50 == 0) { status=strcpy(status,"trigger1"); } if (counter1 %
100 == 0) { status=strcpy(status,"trigger2"); } if (counter1 %
50 == 0) { time(&time_new);
frac1=counter1/(time_new-time_old); } int dumint; float dumfloat; char* dumstring; dumstring=new
char[50]; // delay mysleep(); return StatusCode::SUCCESS; } StatusCode ParentAlg::finalize() { MsgStream
log(msgSvc(), name());
m_publishsvc->UndeclInfo("counter1",counter1);
m_publishsvc->UndeclInfo("fraction",frac1);
m_publishsvc->UndeclInfo("status",status);
m_publishsvc->UndeclInfo("eventtype",myhisto); log <<
MSG::INFO << "finalized successfully" << endreq; return
StatusCode::SUCCESS; } |
The MonitorSvc
The MonitorSvc service is to instantiate various objects (the DimEngine and the DimPropServer). It implements methods for declaring integers, floats, strings and histograms as DIM services. You should not have to modify this code.
The DimPropServer
The DimPropServer implements the rpcHandler method of the DimRpc class.
It allows the configuration of algorithms through RPC commands. This code should not have to be modified. I do not understand how this works and where it is used…to be added later.
Installing PVSS prerequisites
To configure the correct PVSS environment you need to carry out a number of steps in the predescribed order as given in this chapter. These instructions assume that you will be installing PVSS on Windows, but for Linux the procedure should be similar.
Installing PVSS 3.0
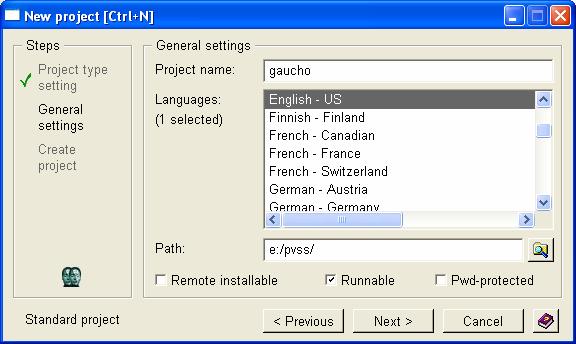
First you need to install PVSS 3.0 (see the instructions on http://itcobe.web.cern.ch/itcobe/Services/Pvss/) , and create a new project in the usual way. I called my project “gaucho”. If you already used PVSS 2.12.2, make sure your project name is not the same as one of a previously existing PVSS 2.12.2 project (bug in PVSS).
Installing the LHCb framework and the Gaucho component
- Download the component installation tool and the LHCb Framework zipfiles from the web page http://lhcb-comp.web.cern.ch/lhcb-comp/ECS/lhcb-fw/ .The current release is 2.0.9.
- Unzip framework2.0.9-lhcb.zip
- Download the installation tool from the web page under point 1.
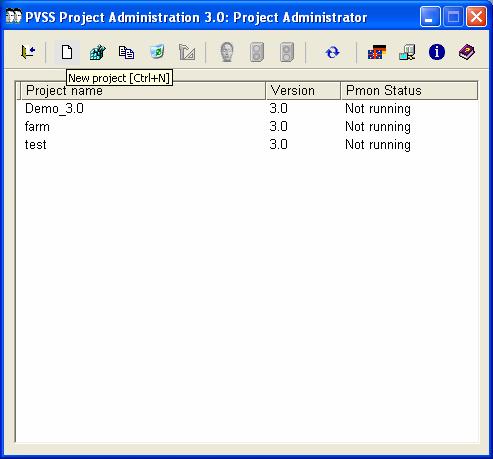
- Create a new PVSS project, e.g. ‘gaucho’ from the Project Administrator tool, by clicking the ‘new project’ icon:
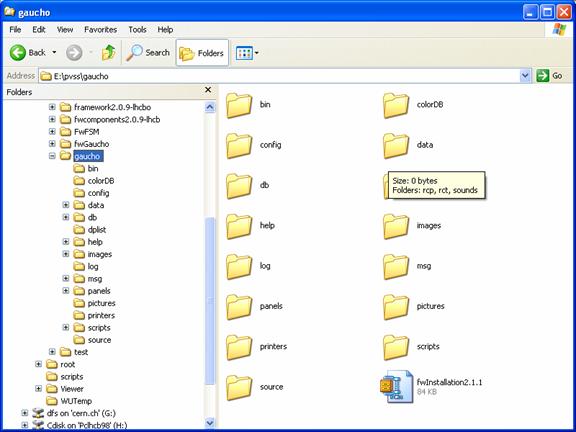
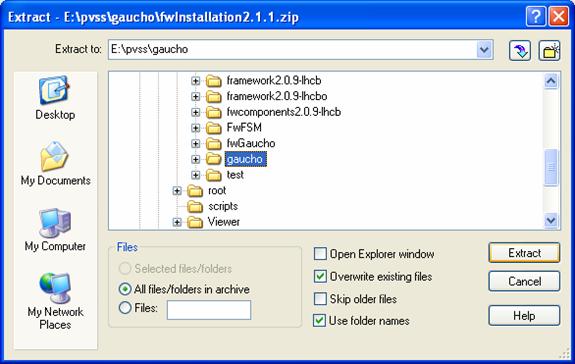
- Unzip the installation tool into the root directory of your ‘gaucho’ project.
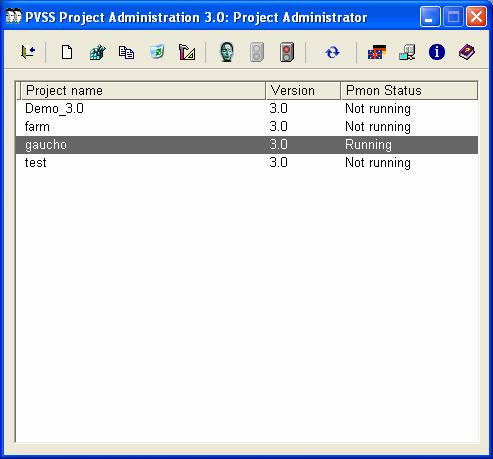
- Start your project from the Project Administrator by clicking the green light:
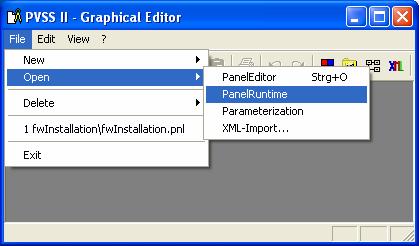
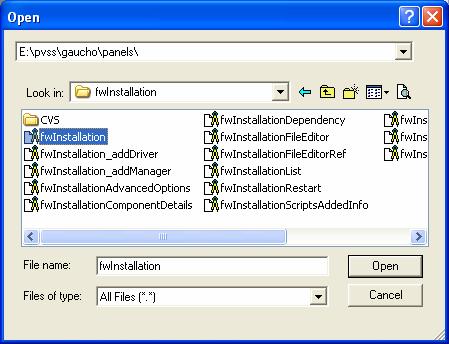
- Open the framework installation tool from the Graphical Editor:
On Linux:
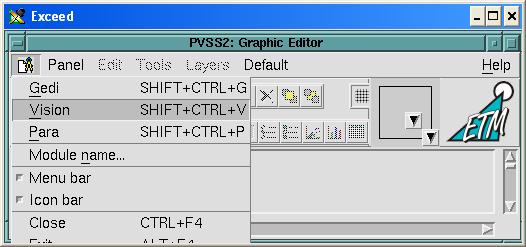
Followed by:
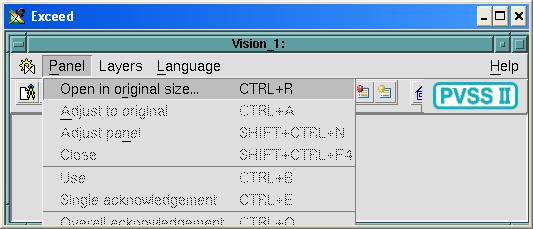
And:
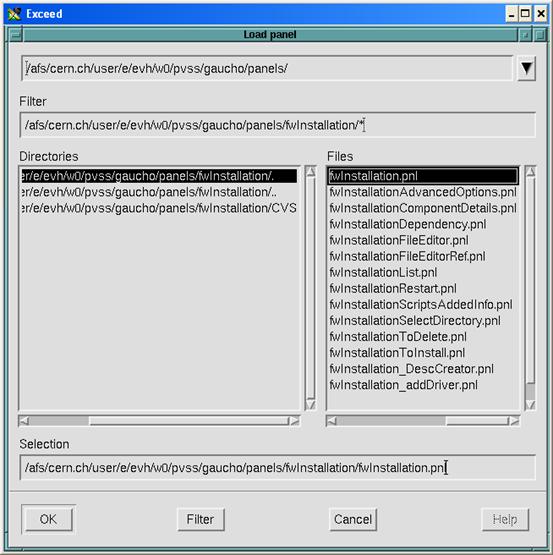
- Click on OK, or change the directory name where you want the framework components to be installed:

- Under “Look for new components in:” put the name of the directory where you unzipped framework2.0.9-lhcb.zip under step 2 above:
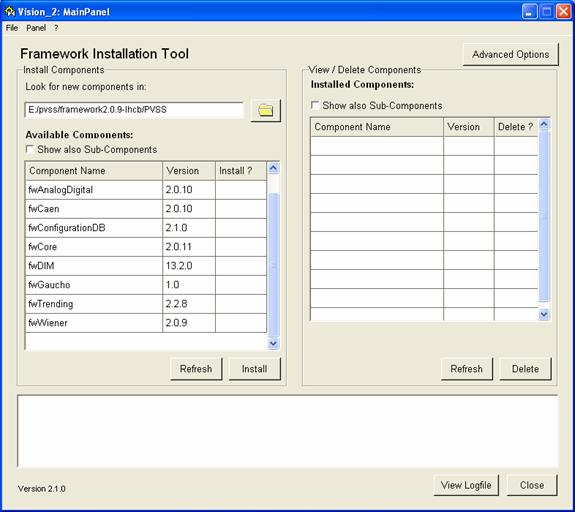
- To install the Gaucho framework component, click on fwCore, fwDIM, fwGaucho in the Install ? column. (You may install other components as you need, now, or later). Then click on Install. After the window:
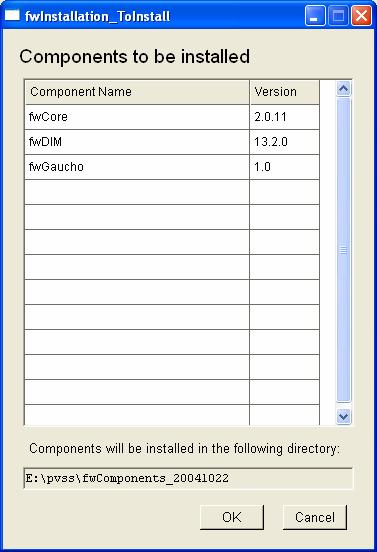
Click on OK. You should get:
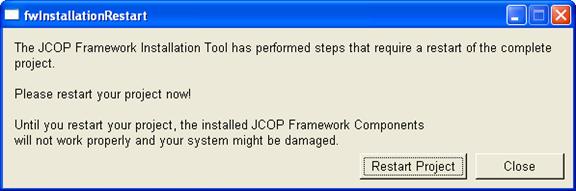
Click on “Restart Project”.
- Your Project Console should look like:
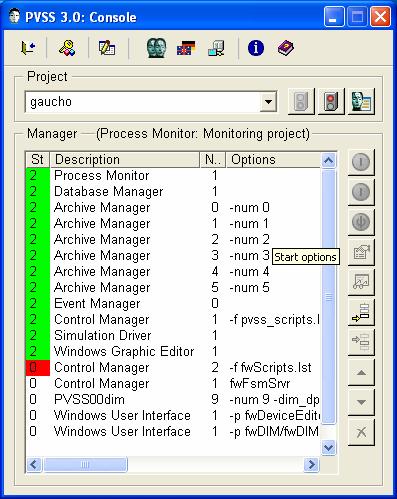
The installation tool added 4 managers. By default they have to be started manually. To change this, double click on them:
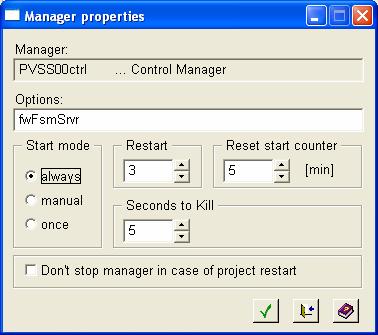
Click on ‘always’ to have the manager start up when you start your project. Before starting the PVSSdim manager, install the DIM DNS.
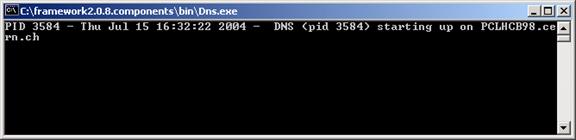
- After installing the framework components, you should have a directory
framework2.0.9.components/bin (or similar). Inside it you will find the DIM Domain Name Server, Dns.exe. DIM needs this program to find out which services are subscribed. Execute it by double clicking on it. A cmd window should appear:
On Linux:
setenv DIM_DNS_NODE yourhost.yourdomain.yourcountry
componentspath/bin/dns &
Modifying the FarmCTRL.ctl library (to allow jobsubmission from your account)
To submit jobs that run under your account on LXPLUS, you need to change the FarmCTRL.ctl library as follows. From a PVSS Graphical Editor window, select Edit->Libraries, and select FarmCtrl.ctl from the drop down menu in the top right hand corner.
In the startGaudijob function, update the path of your startgaudijob in the variable scriptname, edit your afs userid and password xxxxx in cmdname, and remove /k in syscmd if you don’t want to see the cmd window pop up on your screen when you submit a job.
|
scriptname="~/cmtuser/Online/GauchoJob/v1r0/cmt/startgaudijob.sh"; os = getenv("OS"); if (os=="linux") { cmdname="ssh
your_id@"+nodename+" "+scriptname+" &"; } else { cmdname="plink -x -l your_id -pw
your_pwd "+nodename+" "+scriptname; } syscmd="start cmd /k "+cmdname; system(syscmd); |
For Windows, this example uses “plink.exe” that you may need to download from http://www.chiark.greenend.org.uk/~sgtatham/putty/download.html if it is not yet installed on your system. Remember to update your path to point to the place where plink.exe is installed. For Linux this is not necessary.
Using Gaucho
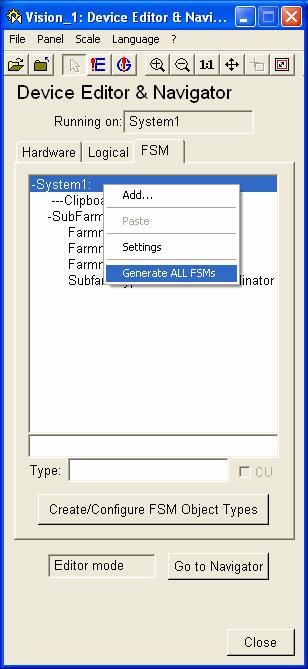
One of the managers you added to the console should start the Device Editor & Navigator:
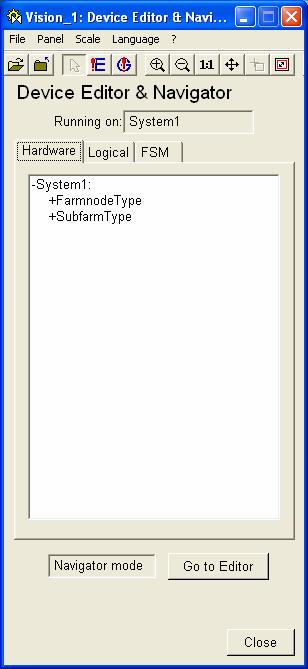
Click on the “FSM” tab.
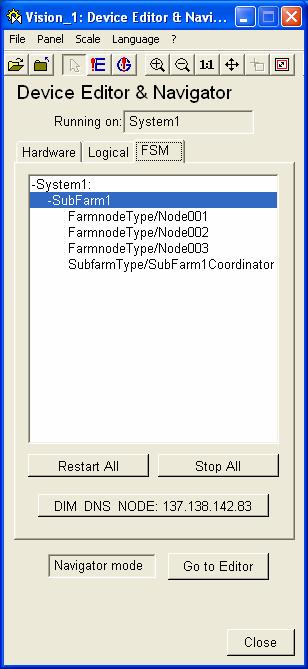
Click on “Go to Editor”, then select and right-click on System1, choose “Generate all FSMs”:
Now click on “Go to Navigator”, click on “Stop All”, then “Restart All”.
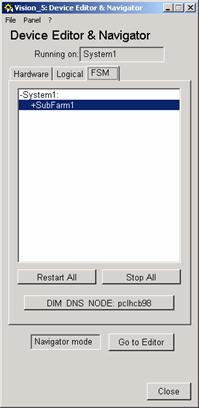
Right-click on SubFarm1, choose “View”:
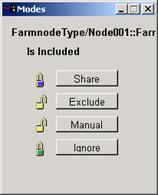
Click on the lock next to Subfarm1, NOT_READY, click on “Take”:
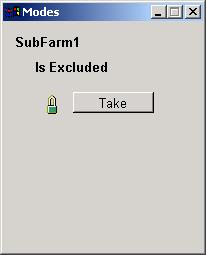
The colour of the NOT_READY fields changes to orange. Now you can decide which of the nodes you want to include or exclude, by default all are included:
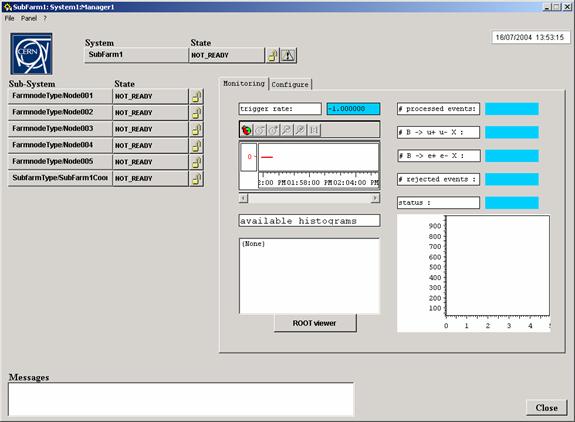
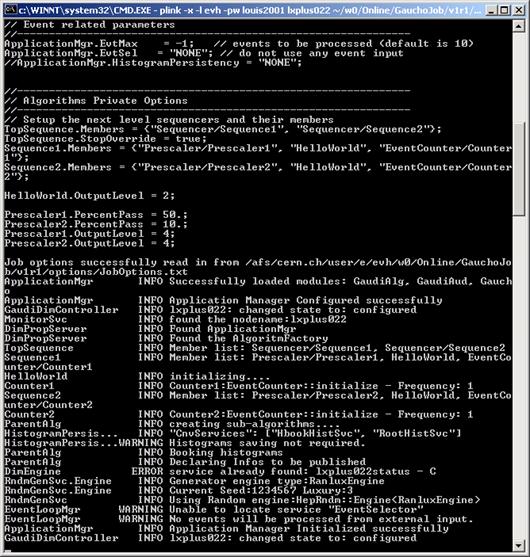
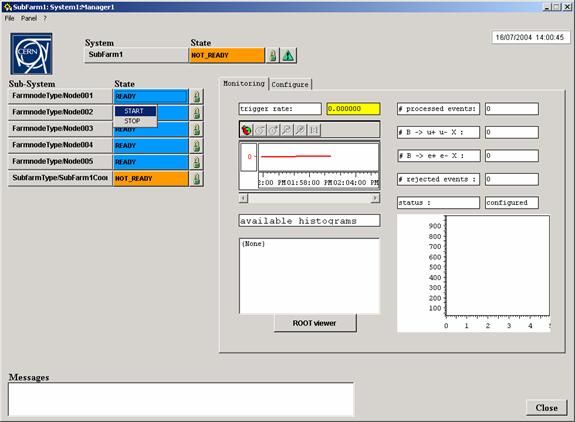
To submit jobs on all farms at the same time, click on the NOT_READY field next to Subfarm1. The CONFIGURE option will show up; select it. To submit a job on one farm at a time, go to the NOT_READY field of an individual node and click it. The result is that the status of the node changes to “configured” and the usual Gaudi ouput appears in a cmd window:
To start a job, go to the READY field, click on it and choose START:
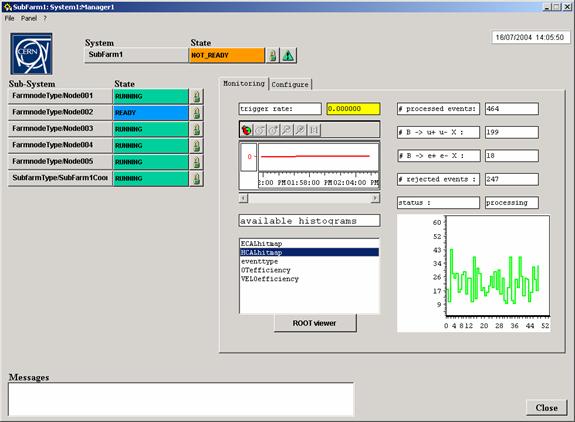
To display the histograms, choose config, then start. The list of available histograms will show up and can be selected by clicking on it. As the jobs progress the values will be updated in real time.
Debugging with DID
If the PVSSDim server crashes, it is possible to send commands to the job using the Dim debugger, DID.
It can be found in the framework2.0.9.components/bin directory and is started by double clicking on the icon.
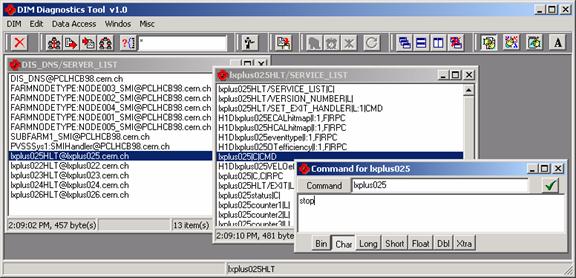
The servers are listed, to send a command to a job, click on the service nodename||C|CMD. A popup window will permit you to send the command you wish.
If you kill a job by simply killing its cmd window, the services will not be undeclared with the DNS and new jobs will not be able to start, unless you kill and restart the DNS.
References
For further references see:
http://lhcb-comp.web.cern.ch/lhcb-comp/ECS/Gaucho/default.htm