This page is obsolete. Please report the refering page

LHCb CondDB broser documentation is now at https://twiki.cern.ch/twiki/bin/view/LHCb/CondDBBrowser


LHCb Conditions Database Browser

Table of Contents

  1. Introduction
  2. Installation of the Browser
  3. Configuration
    1. Loading libraries
    2. Database connection files
  4. Using the CondDB Browser
    1. Starting the browser
    2. Navigating the database
      1. Opening an existing database
      2. The data tree
      3. The data display
    3. Editing the Database
      1. Creating a new database
      2. Adding a new Condition
      3. Tagging
      4. Creating a new node
      5. Deleting a node
      6. Deleting a Tag
  5. Further Readings

Introduction

This document presents the Conditions Database Browser developped for LHCb. It was developped in Python (version 2.4) and the Qt library (version 3.3). It is based on the Conditions Database library COOL. This library allows to use the same interface for various database systems, like Oracle, MySQL or SQLite.

Installation of the Browser

The CondDB Browser is provided with the CondDBUI package. You can get it from CVS by typing:

getpack Tools/CondDBUI

and take the lastest version. The browser's script is python/browser.py.

Configuration

Loading libraries

To be able to run the browser (and anything in the CondDBUI package), you need to import the latest LHCb Environment by typing the command:

LHCbEnv

and chose the default version. This will allow us to import the correct LCG libraries. We actually need nothing from Gaudi or LHCb software.

If LHCb Environment was not loaded before downloading the package, you now need to run cmt's configuration script:

cd cmt
cmt config

source setup.sh (for sh-like shell, typically bash)
source setup.csh (for csh-like shell, typically tcsh)

This is setting up all the necessary environment variables to allow the script to run correctly. As Python is an interpreted language, there is nothing to compile.

Database connection files

The two files we are presenting here are only necessary if you need to connect to remote databases. If you only use local SQLite files, you don't really need them and you can skip this paragraph.

To connect to remote condition databases, we need some authentication procedure. This is provided via the authentication.xml file which should be stored in a safe place (default is $HOME/private. It can be changed in the cmt/requirement file) as it may contain passwords in clear text. Below is an example of the structure of this file:

<?xml version="1.0" ?>
<connectionlist>
 
<connection name="oracle://an_oracle_server/schema">
  <parameter name="user" value="username" />
  <parameter name="password" value="THE_PASSWD" />
</connection>
 
<connection name="oracle://another_oracle_server/schema">
  <parameter name="user" value="username" />
  <parameter name="password" value="THE_PASSWD" />
</connection>
 
<connection name="mysql://a_mysql_server/schema">
  <parameter name="user" value="username" />
  <parameter name="password" value="THE_PASSWD" />
</connection>

</connectionlist>

To connect to a Condition Database, you have to provide a connection string which allows the program to retrieve connection details from the authentication.xml file. However, a simplification is provided: you can define aliases in the dblookup.xml file, which is located in the cmt directory by default. Here is an example:

<?xml version="1.0" ?>
<servicelist>

  <logicalservice name="MasterDB">

    <service name="oracle://an_oracle_server/schema" accessMode="update" authentication="password" />
  </logicalservice>
 
  <logicalservice name="FirstReplicaDB">
    <service name="oracle://another_oracle_server/schema" accessMode="update" authentication="password" />
  </logicalservice>
 
  <logicalservice name="MyLocalDB">
    <service name="mysql://a_mysql_server/schema" accessMode="update" authentication="password" />
  </logicalservice>
 
</servicelist>

Thanks to this file, long and complex connection strings are no longer needed to use connection details from the authentication file. The name of the logical service is the only information needed (as long as the authentication file is provided and contain the relevant information).

Using the CondDB Browser

 This part of the document is mainly a guided tour through which most of the browser's functionalities will be described.

Starting the browser

The CondDB Browser "executable" is actually a Python script. This means that to run it, you have to type (under assumption that you are in the cmt directory):

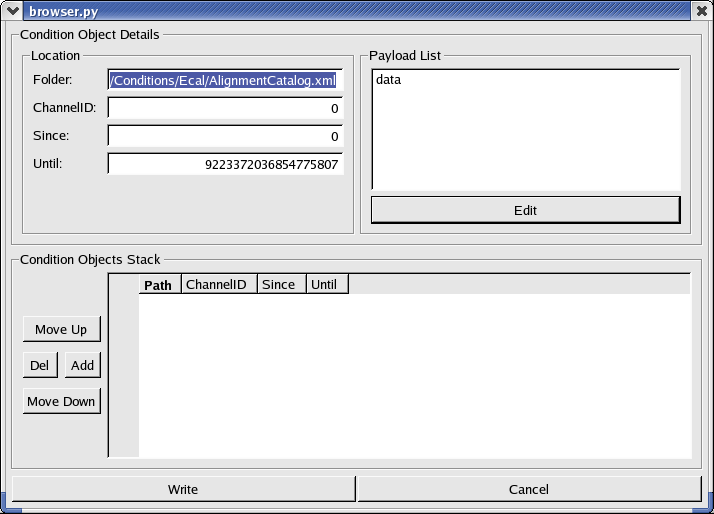
python ../python/browser.py

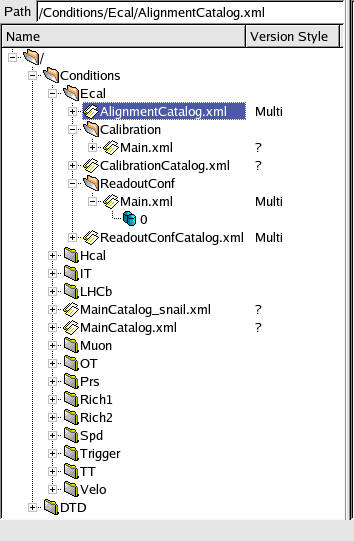
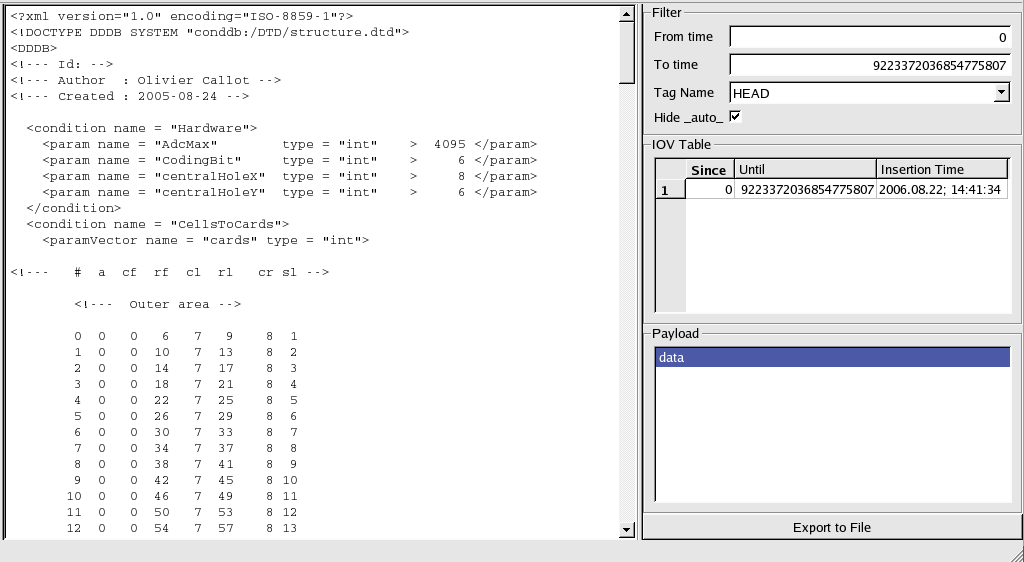
This will open the main window of the browser:

CondDB Browser main window

Navigating the database

Opening an existing database

To open a database from the browser, you have to go to the menu DataBase/Open:

Menu Open Database

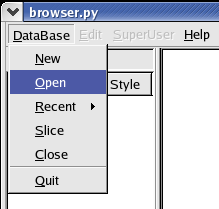
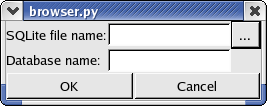
This will display the following dialog window:

Open Database dialog window

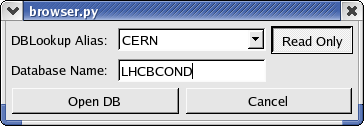
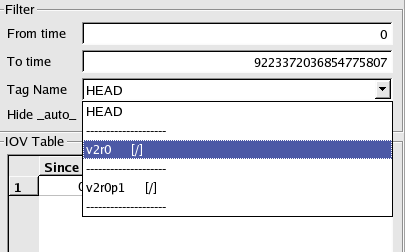
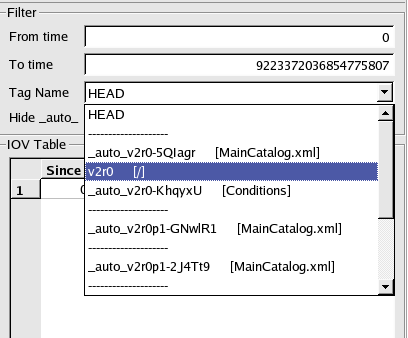
The DBLookup Alias box allows you to choose a database alias as it is defined in the dblookup.xml file. If you don't have such file or if it is empty, it is always possible to choose to open an SQLite file. The Database Name should be provided by the user. Unfortunately, there is no simple way to guess this name and users have to know it to open the database.

By default, the databases are open in Read Only mode. If you are working on a remote database, it is anyway unlikely that you will have read/write access on it. However, if you are working on your own database, you can open it in Read/Write mode by simply pressing the Read Only button.
When you are done, simply press the Open DB button and wait for the browser to establish the connection (for remote databases, this can take some time).

The data tree

Data tree

The above image is an example of the contents of the data tree, located on the left of the browser. You can travel through it like in most file system explorer program. At the top of the tree, you can see a location bar which displays the path to the selected tree item. You can edit this path to go quickly to the item you are interested in.

There are three different type of tree items: FolderSet, Folder and Channel. They are refering to their eponyms in the CondDB. The FolderSets look like directories and can contain only Folders and other FolderSets. The Folders, which look like a file, can only contain Channels. Finally, the Channels, which look like nothing identifiable, but are blue, contain no other tree items. Each of these items is identified by a name (the Channels are identified by a number and the others by a string). Folders items also have a Version Style property, telling if the values stored in the CondDB folder can be tagged ("Multi") or not ("Single"). For efficiency reason, it is not possible to know the version style without selecting the Folder item manually.

The data display

Selecting a Folder or a Channel item will modify the contents of the right side of the main window: the data display. The image below shows what appears when selecting a Channel:

Data display

The data display has two main parts. The left one displays the contents (in text) of a condition object stored in the database. The right one offers the possibility to select the condition object to display. These condition objects are listed in the IOV Table. If this list is too long, the Filter allows to reduce it by selecting a validity range (From time and To time):

list before filteringlist after filtering

If the folder in which the data are stored is a multi-version one, it is possible to get various versions of its contents. This is done using the Tag Name selector:

Tag Name selector (without _auto_ tags)

The selector contains the list of tag names available for the selected Folder (or the Channels inside it). By default, the browser only shows user defined tags, and filters out tags generated automatically (except the HEAD). To display all tags, you can uncheck the Hide _auto_ check box, just below the tag name selector. The list of tags then becomes:

Tag Name Selector (with all tags)

Each group of tags lying between two separator lines are refering to the same data. The name inside the square brackets corresponds to the node (Folder or FolderSet) under which the tag name is visible. Later in this tutorial, we will see in more details how tagging works.

The last feature of the data display part of the browser is the possibility to export the current contents of the text box into a file. This is done by pressing the Export to File button, in the lower right.

Editing the Database

Creating a new database

There are two ways to create a new database: create it from scratch or create a copy of an existing one. These two possibilities are available respectively in the menu DataBase/New and DataBase/Slice. In both cases, you can only create a SQLite database.

Creation from scratch:

The creation from scratch is strait forward: in the dialog, you simply choose a filename and a database name (in capitals), press OK and start playing:

Dialog New DB
Creation from a slice:

To create a slice of a database, you first need to open the source database. Then, open the slice dialog window:

Dialog Slice DB

In the Target Database fields, you should put the filename and database name where you want to store the slice of the source database. From this dialog, it is not possible to override a database file. Thus if the selected target exists, you will not be able to use the Copy action, but only the Append one.

In the Selection Object Creation fields, you will give details of the part of the source database you want to put in the target database. The Node selector contains a list of the source's nodes. The copy is recursive, so if you select a FolderSet, all its childs will be copied as well. The Since and Until fields define the time interval you want to copy in the target database. Only objects valid during this period will be copied. Finally, the tags relevent for the selected node are listed in the Tag Name list. If you are doing a copy, you can select as many tags as you want (by Ctrl + left-mouse-button on their names). However, if you are appending data to the target, you can select only one tag which will become the new HEAD of the target database (i.e. the tag name will not be copied !).

When the details of your selection are correct, you have to press the Add button, on the left of the Selection Object List. This list gives a summary of the selections you want to copy in the target database. You can add as many selection objects as you want, but be careful: some selections may be incompatible and the slicing tool may not accept them.

The final step is to decide if you are creating a copy or appending data to the target. Copy is safe, but Append is a risky operation: selected data are copied to the HEAD of the target database, overriding previous HEAD data. If you are not careful enough you may endup with data loss.

When the copy/appending is done, you can open the target database normally (i.e. via Database/Open and selecting the last choice of the Schema selector).

Adding a new Condition

If you opened your database in read/write mode, a new menu is available: the Edit menu. It provides the most common operation for users willing to modify the content of their database.

The most obvious operation is to add a new condition object. For this, we first need to select the Folder where we want to store this condition (in the data tree). In our example, it will be /Conditions/Ecal/AlignmentCatalog.xml. Then, we open the "add condition" dialog window by selecting Edit/Add Condition:

Add Condition Dialog

The Folder field is read only to prevent mistakes. The other fields allows us to set the Channel ID of our new condition object (0 by default). Since and Until are the lower and upper bounds of the condition object's interval of validity. On the right, the list of available payload keys is displayed. To edit the contents of the condition object, you have to select the Payload Keys you want to modify and press the Edit button.

Edit Condition dialog

A small text editor will then open with a few XML blocks already written. These blocks are mandatory for all conditions data stored in the LHCb Conditions Database. The five buttons at the top of the text editor are providing some helpful operations:

  • Load: load text data from a file. Be aware that this overrides the content of the text editor !
  • Export: save the content of the text editor into a file.
  • <condition>: insert a preformated XML tag for the description of an LHCb condition
  • <param>: insert a preformated XML tag for the description of a condition parameter, which can be of type "int", "double" or "string". A <param> tag must be children of a <condition> tag.
  • <paramvector>: same as <param>, but instead of storing a single value, it stores a vector of values ("int", "double", or "string").

This editor is very basic and, for example, has no "undo" feature. Future version of the browser will probably allow to edit conditions in an external text editor (emacs, vim, nedit, etc.). For the moment, the only possibility for you to do so, is to prepare condition data with your favorite editor and to load the contents in the condition editor.

When you have finished the edition of the condition data, you press OK and get back to the "add condition" dialog. Now, to write the condition in the database, you have to add it to the Condition Objects Stack by pressing the Add button, at the left of the list. A summary of the properties of the condition object will appear.

The stack will contain all the new condition objects you want to add to the selected Folder. Objects in the stack are not (yet) editable, but selecting one of them will reload its parameters in the location details and the payload key list. If you want to "modify" an entry, select it to reload its parameters, modify them, add the new object to the stack, and delete the old version (using the Del button).

The last detail to keep in mind before writing data in the Folder is that conditions objects will be writen to the database in the order they appear in the stack. for example, if you have a condition object A going in channel 0 and with validity from 500 to 1000, and an object B, also in channel 0, with a validity ranging from 700 to 1100, the order in which you insert them will give different results. If A is written before B, you will get A's value valid from 500 to 750, and B's value from 750 to 1100. If B is written before A, A's value will be valid from 500 to 1000 and B's value from 1000 to 1100.

When your list of condition objects is ready, pressing the Write button will update the database. You can now see the result in the browser.

Tagging

To keep track of various possible values of a condition for a given validity range, it is possible to apply a tag to the current state of any node of the database. This is called "tagging". The tagging system of the Conditions Database (called HVS for Hierarchical Versioning System) is very powerful but not easy to describe in a few words.

In the previous section, we have created a new set of condition objects to put inside the /Conditions/Ecal/AlignmentCatalog.xml Folder. To keep track of this modification, we need to apply a tag to it. This is done by first selecting the Folder item in the tree, and open the menu Edit/New Tag:

Tag Folder dialog

You simply have to choose a Tag Name and press the Create button. The tag name you choose must be unique in the database. The new tag is created and should appear in the tag list of the folder. Now, whatever changes you can make to the contents of your folder, the current status of your data can be recovered by selecting the tag you've just created.

Now, when you want to use these conditions, you don't want to specify a tag for each Folder you are going to use. This is why it is possible to create tags for FolderSets as well. But as FolderSets do not contain data (only the Folders contain data), you have to create a "link" between the FolderSets' tag and the tags of the child nodes, which eventually link to the tag of a Folder. This is the principle of the Hierarchical Versioning System.

To illustrate this, we are going to create a new tag for the FolderSet /Conditions/Ecal. To do so, we select it in the tree, and open Edit/New Tag:

FolderSet tag dialog

The dialog is different than the one used to tag a Folder. Here, we have a list of the child nodes of the selected FolderSet. These nodes can be either Folders or FolderSets. But for each of them, we can select the tag name that will be linked to the one we are about to create. By default, it is the HEAD. But if you open the selector in the column Tag Name for the node /Conditions/Ecal/AlignmentCatalog.xml , you should find the tag you've just created.

When you choose to link a FolderSet tag to the HEAD tag of one of its child nodes, the system will automatically create a new tag for this children and create the appropriate link. Tags generated automatically are always starting with "_auto_", so it is a bad idea to use this format for your own tags.

Creating a new node

The creation of a new node in the CondDB is not a common operation. Usually, the structure of the database will be fixed and not supposed to change. For this reason, the New Node action is available in the Advanced menu, together with Delete Node and Delete Tag.

The dialog window for creating a new node looks like this:

Create Node dialog

The Node Name is the full path to the new node, and the Description is a facultative string describing the nature and contents of the node. The list of Storage Keys is meaningless if you are creating a FolderSet. However, it is very important if you are creating a Folder because all the condition object you will store later will have these keys defined. To add a new one, simply press the Add button, and double clic on the new cell to give a name to the new storage key.
Finally, in the Options area, you can decide if you create a FolderSet (by default, you are creating a Folder), if the Folder will be a Single Version one (meaning that no tagging is possible), and asking to recursively create parent nodes (this action does not override existing nodes). Pressing the Create button will make the new node appear in the tree.

Deleting a node

Node deletion is to be use carefully as it results in data loss. To delete a node, you simply select it in the tree and go to menu Advanced/Delete Node. If the node is a FolderSet, it must be empty before being able to delete it.

Deleting a Tag

Tag deletion may also imply data loss. To do it, select the node for which you want to delete a tag, then go to the menu Advanced/Delete Tag. A list of available tags will be given and you simply have to select the one you want to delete. While HEAD is available in the list, you can't delete it (something to be updated in later versions...).

Further Readings

The Conditions Database Browser is a "never finished" project and contributions are welcome. Documentation for the various tools used to develop the program are available on the web:

As it is now, it should respond to most of the users requests for database manipulation. For more advanced features, you can use:

For more details about the Conditions Database framework in LHCb, please refer to the Detector Conditions web page.


Last edited: 2006-09-29 - Nicolas Gilardi